

Peek-a-Boo Cake: 7 Steps to Pure Baking Joy
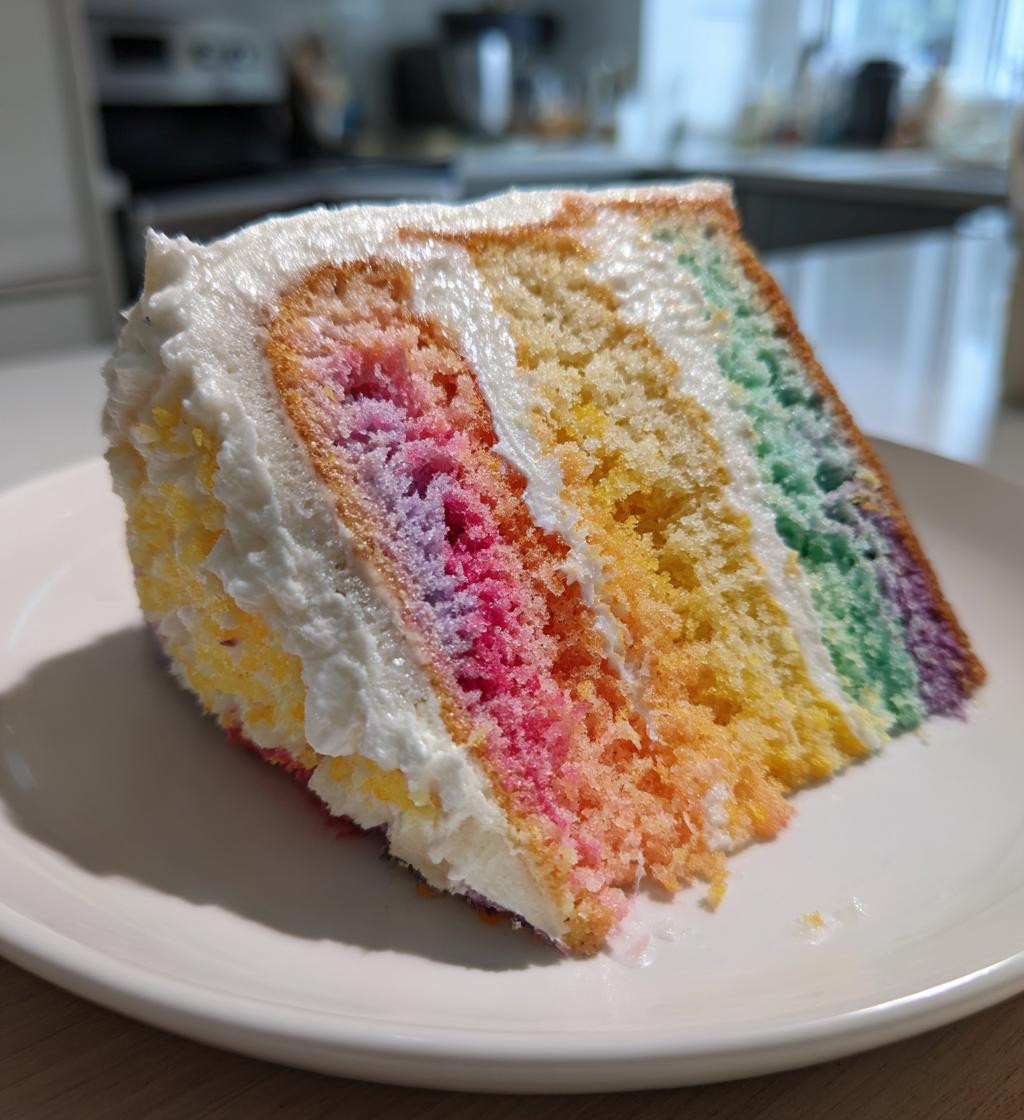
Oh my goodness, have you ever experienced the joy of cutting into a cake and seeing a burst of color surprise you? That’s exactly what my Peek-a-Boo Cake does! This vibrant, fun cake is perfect for any celebration, whether it’s a birthday party, a baby shower, or just a whimsical dessert night with friends. I remember the first time I made it for my niece’s birthday—I could hardly wait for her to slice into it! The look on her face was priceless when the colorful layers were revealed. It’s a guaranteed showstopper that not only tastes delicious but also brings a sense of wonder to the table. Trust me, once you try it, you’ll be hooked!
Ingredients List
- 2 cups all-purpose flour
- 1 ½ cups granulated sugar
- ½ cup unsalted butter, softened
- 1 cup milk
- 3 large eggs
- 2 teaspoons baking powder
- 1 teaspoon vanilla extract
- Food coloring (various colors for that vibrant surprise!)
How to Prepare a Peek-a-Boo Cake
Alright, let’s dive into the fun part—making this stunning Peek-a-Boo Cake! I promise, it’s easier than it looks, and you’ll love every step. Just follow along, and let’s get that colorful surprise ready!
Preparing the Batter
First things first, let’s get that batter going! Start by creaming the softened unsalted butter and granulated sugar in a large mixing bowl. You want to beat them together until it’s light and fluffy—this is crucial for the cake’s texture, so don’t rush it! Once you’ve got that beautiful creamy mixture, add in the eggs one at a time, mixing well after each addition. Then, pour in the milk and vanilla extract, stirring until everything is blended together. Now, in a separate bowl, whisk together the all-purpose flour and baking powder. Gradually add this dry mixture to your wet ingredients, mixing until just combined. Overmixing can lead to a dense cake, so be gentle!
Adding Color
Now comes the magic part! Divide your batter into several smaller bowls—how many depends on how many colors you want to use. I usually go for three or four vibrant shades. This is where gel food coloring comes in handy, as it gives you those bright, beautiful colors without adding too much liquid. Just a few drops of each color will do! Use a spatula or a whisk to mix the coloring in thoroughly. You’ll love seeing the colors come to life, so have fun with it!
Baking the Cake
Once your batter is all colorful and mixed, it’s time to bake! Preheat your oven to 350°F (175°C) and prepare those greased and floured cake pans. Start pouring your colored batter into the pans, layer by layer, creating a fun pattern. I like to alternate colors, but feel free to get creative! Bake for about 30-35 minutes. To check if they’re done, insert a toothpick into the center of the cakes; if it comes out clean, you’re good to go! Just keep an eye on them, as oven temperatures can vary.
Cooling and Frosting
Once baked, remove the cakes from the oven and let them cool in the pans for about 10 minutes. Then, carefully transfer them to a wire rack to cool completely. This step is super important—if you frost them while they’re still warm, the frosting will just melt away! Once cooled, it’s time to frost! You can use your favorite frosting, and when you slice into the cake, the colorful layers will be revealed. It’s such a delightful surprise! Don’t forget to take a picture before everyone digs in!
Why You’ll Love This Recipe
- It’s a showstopper! The hidden colorful layers make for an exciting surprise when you cut into it.
- Super fun to make! Kids and adults alike will love getting creative with the colors.
- Perfect for any occasion—birthdays, holidays, or just a cheerful treat on a Tuesday.
- Easy to prepare with straightforward steps, making it great for bakers of all skill levels.
- Customizable! You can choose any color combinations to match themes or personal favorites.
- Deliciously moist and fluffy, ensuring that everyone will come back for seconds.
- It brings smiles and joy to the table, making every gathering a little more special.
Tips for Success
Now that you’re ready to create your Peek-a-Boo Cake, let me share some of my best tips to ensure it turns out absolutely perfect! Trust me, these little nuggets of wisdom will save you time and help you impress your family and friends.
- Use gel food coloring: For the most vibrant colors, I always recommend gel food coloring. It gives you that rich hue without altering the batter’s consistency. Plus, it’s so fun to see the colors pop!
- Don’t overmix: When you combine the wet and dry ingredients, be gentle. Overmixing can lead to a dense cake, and we want it light and fluffy. Just mix until everything is barely combined.
- Chill your frosting: If you’re using buttercream, pop it in the fridge for a bit before frosting. It makes it easier to spread and helps it hold its shape on the cake.
- Layer creatively: When pouring the batter into the pans, feel free to get creative with your layers! Alternate colors, swirl them together, or even pour them in sections for a striped effect. The more fun, the better!
- Storage: Once your cake is frosted, store any leftovers in an airtight container at room temperature for up to three days. If you want to keep it longer, you can refrigerate it, but allow it to come to room temperature before serving for the best taste.
- Experiment with flavors: Don’t hesitate to mix things up! You can add a hint of almond extract or lemon zest to the batter for a delightful twist. The color combinations can match the flavors for a cohesive theme!
- Frosting technique: When frosting, start with a crumb coat (a thin layer to catch any loose crumbs) and then add a thicker layer after it sets. This will give you a smooth, professional finish and make those colorful layers really pop when you cut into it!
With these tips in your back pocket, you’re all set to create a Peek-a-Boo Cake that’s not just a treat for the taste buds, but also a feast for the eyes. Happy baking!
Nutritional Information
Alright, let’s talk about the numbers behind this vibrant Peek-a-Boo Cake! Just a heads-up, these values are estimates and can vary depending on the specific ingredients you use. But here’s a general idea of what you can expect per slice:
- Calories: 350
- Fat: 15g
- Saturated Fat: 9g
- Unsaturated Fat: 6g
- Trans Fat: 0g
- Cholesterol: 70mg
- Sodium: 150mg
- Carbohydrates: 50g
- Fiber: 1g
- Sugar: 25g
- Protein: 5g
So, while you’re indulging in this colorful delight, keep in mind that it’s all about balance! Enjoy every slice knowing it’s a fun treat that brings joy to your celebrations!
FAQ Section
Got questions about the Peek-a-Boo Cake? Don’t worry, I’ve got you covered! Here are some common queries I hear, along with my answers to help you navigate this fun baking adventure.
Can I use a different type of flour?
Absolutely! If you want to experiment, you can use cake flour for an even lighter texture. Just keep in mind that using whole wheat flour will change the flavor and texture slightly, so it’s best to stick with all-purpose or cake flour for that classic cake taste.
What can I substitute for eggs?
If you’re looking for an egg substitute, you can use applesauce (1/4 cup per egg) or a flaxseed mixture (1 tablespoon of ground flaxseed mixed with 2.5 tablespoons of water, let it sit for 5 minutes). Both options will work well and keep your cake moist!
How do I store leftovers?
To keep your Peek-a-Boo Cake fresh, store it in an airtight container at room temperature for up to three days. If you need to keep it longer, pop it in the fridge. Just make sure to let it come to room temperature before serving again for the best taste!
Can I freeze the cake?
Yes, you can definitely freeze the cake! I recommend wrapping it tightly in plastic wrap and then placing it in a freezer-safe container. It should stay fresh for about two months. When you’re ready to enjoy it, let it thaw in the fridge overnight.
Can I change the colors to match a theme?
Of course! That’s one of the best parts! You can customize the colors to match any celebration—pastels for a baby shower, bright colors for a birthday, or even your favorite sports team colors! The sky’s the limit!
What type of frosting works best?
Buttercream is a classic choice because it’s easy to work with and delicious! Cream cheese frosting is another fantastic option, especially if you want a tangy twist. Whichever you choose, make sure it’s thick enough to hold its shape when you frost the cake.
Can I add different flavors to the cake?
You sure can! Add a teaspoon of almond extract or a splash of orange juice to the batter for a lovely flavor twist. Just remember to adjust the amount of vanilla extract to keep the balance right!
If you have any more questions as you bake this colorful delight, feel free to reach out! I can’t wait to hear about your Peek-a-Boo Cake adventures!
Serving Suggestions
Now that you’ve created this stunning Peek-a-Boo Cake, let’s talk about how to make the whole experience even more delightful! Here are some fun ideas for what to serve alongside your colorful creation that will really elevate your dessert game.
- Refreshing beverages: Pair your cake with a light, refreshing drink like iced tea or lemonade. The zesty flavors will balance the sweetness of the cake beautifully!
- Coffee or tea: A nice cup of coffee or your favorite tea can be the perfect complement to the cake. The warm, comforting flavors will enhance the cake’s festive vibe.
- Fruit salad: A vibrant fruit salad, maybe with a mix of berries, melons, and citrus, adds a fresh and healthy touch to your dessert spread. Plus, it looks gorgeous next to the cake!
- Whipped cream or ice cream: Don’t forget a dollop of whipped cream or a scoop of vanilla ice cream! The creaminess contrasts wonderfully with the colorful layers and adds an extra touch of indulgence.
- Chocolate sauce: Drizzling some rich chocolate sauce over a slice can take it to the next level. Who can resist that combination of chocolate and cake?
- Cheese platter: For a unique twist, serve your cake alongside a selection of cheeses. The savory notes from the cheese can create a delightful contrast with the sweet cake.
These serving suggestions can help create a festive atmosphere and make your Peek-a-Boo Cake even more enjoyable. Mix and match to find your perfect combination, and watch as everyone digs in with delight!
Storage & Reheating Instructions
Let’s talk about how to keep your gorgeous Peek-a-Boo Cake fresh and delicious after the party! I want you to savor every bite, so here’s the scoop on storage and reheating.
First off, if you have any leftovers (which might be unlikely because it’s so good!), make sure to store them in an airtight container. This will help keep the cake moist and prevent it from drying out. You can keep it at room temperature for about three days. If you want it to last longer, you can refrigerate it, but try to let it come back to room temperature before serving again to enjoy the best flavor and texture.
If you’re thinking about freezing your cake, you can absolutely do that too! Just wrap each slice tightly in plastic wrap and then place them in a freezer-safe container or a resealable freezer bag. This way, you can enjoy a slice of joy anytime you want! It should stay good for about two months. When you’re ready to indulge, simply take it out and let it thaw in the fridge overnight. No need to reheat—just slice and enjoy that delightful surprise all over again!
Print
Peek-a-Boo Cake: 7 Steps to Pure Baking Joy
- Total Time: 1 hour 5 minutes
- Yield: 12 servings 1x
- Diet: Vegetarian
Description
A fun and colorful cake that surprises with hidden decorations inside.
Ingredients
- 2 cups all-purpose flour
- 1 ½ cups sugar
- ½ cup unsalted butter
- 1 cup milk
- 3 eggs
- 2 tsp baking powder
- 1 tsp vanilla extract
- Food coloring (various colors)
Instructions
- Preheat your oven to 350°F (175°C).
- Grease and flour two 9-inch round cake pans.
- In a bowl, cream the butter and sugar together.
- Add eggs, milk, and vanilla. Mix well.
- Combine flour and baking powder, then gradually add to the wet mixture.
- Divide the batter into separate bowls and add food coloring to each.
- Pour colored batter into the prepared pans, creating layers.
- Bake for 30-35 minutes or until a toothpick comes out clean.
- Let the cakes cool completely before frosting.
- Frost the cake and reveal the colorful layers when sliced.
Notes
- Use gel food coloring for more vibrant colors.
- Store in an airtight container to keep fresh.
- Customize colors for different occasions.
- Prep Time: 30 minutes
- Cook Time: 35 minutes
- Category: Dessert
- Method: Baking
- Cuisine: American
Nutrition
- Serving Size: 1 slice
- Calories: 350
- Sugar: 25g
- Sodium: 150mg
- Fat: 15g
- Saturated Fat: 9g
- Unsaturated Fat: 6g
- Trans Fat: 0g
- Carbohydrates: 50g
- Fiber: 1g
- Protein: 5g
- Cholesterol: 70mg
Keywords: Peek-a-Boo Cake, colorful cake, surprise cake