

Classic Apple Crisp: 5 Ways to Love This Comforting Dessert
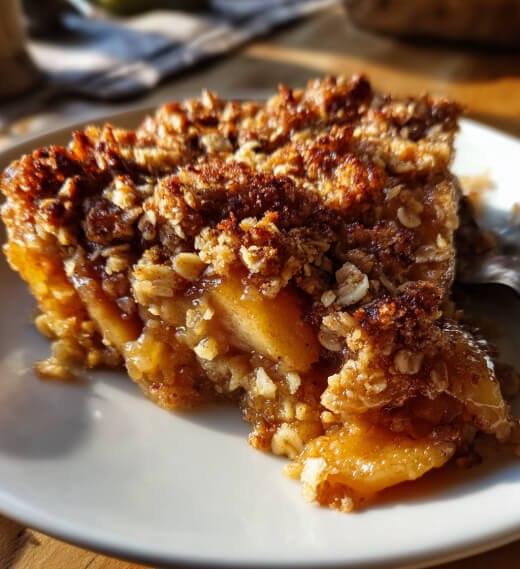
There’s something truly magical about a Classic Apple Crisp that just warms your heart and fills your home with the sweetest aromas! Picture this: tender, juicy apples baked to perfection, blanketed beneath a glorious, golden topping that’s crisp and buttery. This dessert isn’t just a treat; it’s a hug in a bowl! Historically, apple crisp has been a beloved staple in American kitchens, comforting families for generations. With each spoonful, you’ll taste the nostalgia and warmth that comes from simple ingredients transformed into something extraordinary. Trust me, whether it’s a chilly evening or a sunny day, this dish will bring smiles and warmth to your table. So, let’s dive into this delightful recipe and share the joy of making it together!
Ingredients for Classic Apple Crisp
Gathering the right ingredients is key to achieving that perfect balance of flavors and textures in your Classic Apple Crisp. Here’s what you’ll need:
- 6 cups sliced apples – I love using a mix of tart and sweet apples, like Granny Smith and Honeycrisp, for the best flavor!
- 1 cup rolled oats – These give that delightful chewiness to the topping, making every bite irresistible.
- 1 cup brown sugar – Make sure it’s packed for that rich, caramel-like sweetness that complements the apples beautifully.
- 1/2 cup all-purpose flour – This will help bind the topping together and create that gorgeous crisp texture.
- 1/2 cup unsalted butter, melted – Melted butter is a game changer! It brings everything together and adds a luscious richness.
- 1 tsp cinnamon – Because what’s an apple dessert without cinnamon? It adds warmth and a hint of spice.
- 1/4 tsp salt – Just a pinch to enhance all the sweet flavors and balance the dish perfectly!
With these simple ingredients, you’re well on your way to creating a comforting dessert that everyone will love!
How to Prepare Classic Apple Crisp
Getting your Classic Apple Crisp ready is a breeze, and I promise the end result is more than worth it! Let’s break it down step by step to make sure everything goes smoothly.
Preheat the Oven
First things first, you’ll want to preheat your oven to 350°F (175°C). Preheating is crucial because it ensures that the apples start to cook evenly and the topping gets that perfect golden crisp. While it’s heating up, you can get everything else ready!
Prepare the Apples
Now onto the apples! I usually choose a mix of tart and sweet varieties, like Granny Smith and Honeycrisp, for the best flavor combo. Slice them thinly—about 1/4 inch thick works great—and place them in a greased baking dish. Make sure they’re evenly spread out so they cook uniformly. If you like, you can sprinkle a little bit of lemon juice over them to keep them from browning and add a touch of brightness!
Make the Topping
In a large bowl, combine your rolled oats, brown sugar, flour, cinnamon, and salt. Give it a good mix! Then, pour in that melted butter and stir until everything is well combined—you’re aiming for a crumbly texture that holds together but isn’t too wet. It should look like damp sand, just enough to create a nice topping when it bakes!
Assemble and Bake
Spread the oat mixture evenly over the prepared apples, making sure to cover them well. This is where the magic happens! Pop the dish into your preheated oven and bake for 30-35 minutes. You’ll know it’s done when the apples are tender and the topping is a beautiful golden brown. The aroma wafting through your kitchen will be simply irresistible!
Tips for Success
To ensure your Classic Apple Crisp turns out perfectly every time, here are some tried-and-true tips that I swear by! First, always check for doneness by poking a fork into the apples; they should be tender but not mushy. If the topping is browning too quickly, you can cover it loosely with aluminum foil for the last few minutes of baking.
When it comes to serving, I highly recommend enjoying it warm with a scoop of vanilla ice cream or a dollop of whipped cream on top—trust me, it takes the flavors to a whole new level! As for storage, if you have leftovers (which is rare!), simply cover them with plastic wrap and keep them in the fridge for up to three days. You can reheat it in the oven for that fresh-out-of-the-oven taste! Enjoy your baking adventure!
Why You’ll Love This Recipe
- Quick and Easy: With just a handful of simple ingredients and straightforward steps, you can whip up this dessert in no time! It’s perfect for those busy weeknights when you crave something sweet.
- Ultimate Comfort Food: There’s nothing quite like a warm bowl of apple crisp to make you feel cozy and content. It’s the kind of dessert that wraps you in a comforting hug with every bite!
- Customizable: Feel free to experiment with different apple varieties or even throw in some nuts or dried fruits for an extra twist. It’s a versatile recipe that can adapt to your taste!
- Perfect for Sharing: This recipe yields 8 generous servings, making it ideal for family gatherings or a cozy get-together with friends. Everyone will be going back for seconds!
- Deliciously Aromatic: The warm scent of cinnamon and baked apples wafting through your kitchen will have everyone eagerly waiting for dessert. It’s like a warm welcome home!
Nutritional Information for Classic Apple Crisp
When you’re enjoying a warm bowl of Classic Apple Crisp, it’s nice to know what you’re savoring! Here’s a breakdown of the estimated nutritional values per serving, which is about 1/8 of the recipe. Keep in mind that these values are estimates and can vary based on the specific ingredients you use.
- Calories: 220
- Fat: 9g
- Saturated Fat: 5g
- Unsaturated Fat: 3g
- Trans Fat: 0g
- Cholesterol: 20mg
- Sodium: 150mg
- Carbohydrates: 35g
- Fiber: 3g
- Sugar: 15g
- Protein: 2g
This Classic Apple Crisp is not only delicious but also brings some wholesome ingredients to the table. So, go ahead and indulge—this comforting dessert is worth every single bite!
FAQ Section
Can I use different types of apples?
Absolutely! One of the best things about making Classic Apple Crisp is the flexibility with apples. I love using a mix of tart apples like Granny Smith and sweeter options like Honeycrisp or Fuji. The combination creates a delicious balance of flavors that makes every bite a delight. Feel free to experiment with your favorite varieties to find your perfect blend!
How should I store leftovers?
If you happen to have any leftovers (which is rare because it’s so good!), just cover the dish with plastic wrap or transfer the crisp to an airtight container. It’ll keep in the refrigerator for up to three days. To reheat, simply pop it back in the oven at 350°F (175°C) for about 10-15 minutes until it’s warmed through. That way, you can enjoy that fresh-baked taste all over again!
Can I make this recipe gluten-free?
You bet! To make your Classic Apple Crisp gluten-free, just swap out the all-purpose flour for a gluten-free flour blend and use certified gluten-free oats. There are some great options available nowadays that work wonderfully in this recipe. You won’t miss a thing, and it’ll still be just as delicious!
Serving Suggestions for Classic Apple Crisp
When it comes to serving your Classic Apple Crisp, the possibilities are truly delightful! Here are a few of my favorite pairings that elevate this comforting dessert even further:
- Vanilla Ice Cream: A scoop of creamy vanilla ice cream melting over the warm crisp is pure bliss!
- Whipped Cream: A dollop of fluffy whipped cream adds a light, airy touch that complements the rich flavors.
- Caramel Sauce: Drizzling warm caramel sauce on top takes it to a whole new level of indulgence.
- Greek Yogurt: For a healthier twist, try serving it with a spoonful of tangy Greek yogurt—it’s a great balance!
Whichever way you choose to serve it, your Classic Apple Crisp will be a hit every time! Enjoy!
Sourdough Apple Pie
Banana Flour Pancakes
Apple Nutrition

Classic Apple Crisp: 5 Ways to Love This Comforting Dessert
- Total Time: 50 minutes
- Yield: 8 servings 1x
- Diet: Vegetarian
Description
A warm and comforting dessert made with baked apples and a crispy topping.
Ingredients
- 6 cups sliced apples
- 1 cup rolled oats
- 1 cup brown sugar
- 1/2 cup all-purpose flour
- 1/2 cup unsalted butter, melted
- 1 tsp cinnamon
- 1/4 tsp salt
Instructions
- Preheat the oven to 350°F (175°C).
- Place sliced apples in a greased baking dish.
- In a bowl, mix oats, brown sugar, flour, cinnamon, and salt.
- Pour melted butter over the oat mixture and stir until combined.
- Spread the topping evenly over the apples.
- Bake for 30-35 minutes until apples are tender and topping is golden.
Notes
- Serve warm with ice cream or whipped cream.
- Store leftovers in the refrigerator.
- Prep Time: 15 minutes
- Cook Time: 35 minutes
- Category: Dessert
- Method: Baking
- Cuisine: American
Nutrition
- Serving Size: 1/8 of recipe
- Calories: 220
- Sugar: 15g
- Sodium: 150mg
- Fat: 9g
- Saturated Fat: 5g
- Unsaturated Fat: 3g
- Trans Fat: 0g
- Carbohydrates: 35g
- Fiber: 3g
- Protein: 2g
- Cholesterol: 20mg
Keywords: Classic Apple Crisp